Quick and Easy Vegetarian Stroganoff

image

I have been trying to feed my family more vegetarian/vegan meals. In the midst of experimenting,  I came up with a really yummy, quick and easy Stroganoff! You could easily make this vegan by replacing the sour cream with vegan sour cream. I hope you enjoy!

Ingredients:
1 1/2 cups sliced baby Bella mushrooms
2 cups Vegetable Broth
1/4 cup All purpose flour
2 Tbsp tomato paste
1 medium onion sliced thinly
2 cloves or garlic
1 tbsp olive oil
1 pound of veggie crumbles of your choice (I used Quorn crumbles)
1 tbsp vegan Worcestershire Sauce
1/3 cup sour cream (I used light)
1 packet of Onion Soup Mix (Make sure it it vegetarian/vegan)
Salt and pepper to taste
Cooked ribbon noodles or cooked rice
Directions:
  1. Heat oil in skillet and cook onions and garlic until translucent.
  2. Add mushrooms and cook for 5 minutes.
  3. Add crumbles skillet and season lightly with salt and pepper.
  4. Once all crumbles are heated , add the flour, packet of onion mix, tomato paste and Worcestershire sauce. Mix thoroughly.
  5. Add the veggie broth. Let the mixture simmer until it starts bubbling.
  6. Add the sour cream.
  7. Taste and adjust seasoning to taste if needed.
  8. Serve over cooked noddles or rice. Enjoy!

PARENTS!

It’s amazing how God works sometimes. I was joking with my husband a couple of days ago and told him how I thought God had a really interesting sense of humor. Let me explain.

This year has been full of changes, but in the month of August we’ve gone though some major ones:

  • My husband has been in the process of obtaining his ministry license for the past year, and on August 10th, he passed his interview to become a licensed ministry worker with the CMA (Christian Missionary Alliance church denomination). That’s one step closer to becoming a pastor!
  • I resigned from my position at church as the Early Childhood Coordinator. Part of the process of Brian becoming a minister is attending a CMA church together. We had to move from our home church of the last 10 years (CF CityPlace) in order for this to happen, thus me stepping away from ministry. It was a difficult decision, I loved the volunteers, kids and their families, but I knew this is what God wanted us to do.
  • Brian resigned from his position as the Mentoring Program Coordinator, a program that he started from the ground up in the inner city of West Palm Beach. The program is run by Bow Down Ministries, and because of the move to a CMA church he had to step down.
  • A new school year started, meaning that as a 5th grade teacher Brain had to get everything in order. We needed to get Brian’s classroom ready! God bless Pinterest! (will be posting a blog on his room decoration soon!)
  • And the most important thing was that we completed our adoption home study! We were able to start looking at children!

We were so excited about the last change, but with everything else that happened in August we were taking this new change slowly. We had decided to start slowly by just looking at children and praying for God to guide us in the process. We had been told by our wonderful Case Manager that it could take a year or more in order for us to be able to find a child.

Well, remember when I said that God has a really strange sense of humor? This is why.

OLYMPUS DIGITAL CAMERA

A week after completing our home study we received an email asking if we would consider submitting our file for adoption consideration of a little 5 year old boy. We prayed, read the information and decided to step out on faith and say yes. Three days later we were asked if we would be open to receiving the little boy in our house sooner rather than later, we said yes once again. Two days after that we received our little boy in our home!!!! He’s a 5 year old fountain of energy, smiles and fun. We couldn’t be happier and more tired at the same time, LOL!

God has blessed us in a way that words can’t describe. Our hearts are full of joy, love and gratitude. Our little family is complete!

We are now entering uncharted territory. Not only in the legal realm of waiting periods and paperwork and visits from social workers, but in the parenting world as well. We are learning all about bedtimes, school, books, games, toys, clothes and everything else a 5 year old might need. Due to legal and privacy issues posting pictures of our little one is not allowed until everything is final.

I’ve been feeling like those ladies in the TV show “I Didn’t Know I was Pregnant.” Out of nowhere there’s this little person that just showed up and that needs all our attention. Completely overwhelmed and happy at the same time. I wouldn’t have it any other way.

Thank you to all of those family and friends who have prayed for us, and have been of encouragement during this time. We love you all. If you would please still keep us in your prayers, we would really appreciate it. We need God’s guidance in this process. The adoption is not final yet, we have to wait for 30 days for some legal processes to complete and then another wait of 60 days before we can finalize the adoption.

Much love,

Karla & Brian

We’re

It’s been eight years since I said I do to the love of my life. We’ve experienced highs and lows, been each other’s support systems and encountered so many changes in our lives.

Sometimes it amazes me how naive I was when we got married. I had all these carefully laid plans on how everything would go for us: enjoy being just us for a couple of years, have Brian become a minister, grow in love with each other and with God and then start a family. Well, life had other plans.

I’m pretty sure that those who know us can attest that we both love children. We’ve worked with kids of all ages for years. Whether it was our profession (Brian is an elementary teacher) or as part of our ministry. I’ve worked with preschoolers in church for over 20 years. Brian has worked with at risk children for the same time in schools, churches, camps, etc. It’s engrained in our DNA, sort of speak.

When we first got married I knew there was a possibility that it would be a challenge to conceive. I had experienced some issues during my youth and had an idea that we would need to see a doctor at least. Well it was more than that. After almost a year of trying and seeing a doctor and taking medications, we decided to see a specialist. The news we got were heartbreaking: we had less than 5% chance of conceiving. Unexpectedly we both had issues. When we first shared this with family and friends we got everything from: “God can make a miracle happen, all you need is faith,” to “Oh well, maybe this is God’s way.”

We knew in our hearts that we are filled with love to give to a child. We were given the option to explore in vitro fertilization (IVF) but even that wasn’t guaranteed. We decided to move in faith and start saving, even creating a funding website to help raise funds. We had some very generous family and friends that donated, and to which we are grateful to this day. After a year, we were still a long ways of to reaching our goal of $15,000.

We looked into private adoptions of newborns as well, but those are even more expensive than the IVF procedure would be.

During a church service a little over a year ago, there was an announcement for Place of Hope, a local non-profit that houses an orphanage and assists in fostering and adoptions from the foster care system.

We decided to pray and attend the informational meeting for the adoption class. I knew that I couldn’t make the commitment of becoming a foster parent, loving and caring for a child that might return to the unhealthy environment they had been removed from.

We faced adversity even from the start of the class: our teacher was adamant that we would never be able to adopt a young child, paperwork took longer than expected since we were moving, my grandma passed away and that pushed everything back as well. When we returned to the task of completing our paperwork we were told that the agency could no longer facilitate adoptions, we had to start the process all over again with a new agency. It has taken us a year, but we can finally say that it is official:

WE ARE ADOPTING!!!!!!!

image

We’re adopting!

It might take us a while to find our child, but the search has started. We hope you will pray for God to guide us to our forever child.

Thanks,

Karla & Brian

Wedding Cake preparation experience

20150222_144041

I was asked by very good friends to make their wedding cake a couple of months ago. I was super excited with the prospect of taking this new challenge on. What I was not expecting was the planning it took to get it done. I had a mental picture of what I wanted the cake to look like, but being a perfectionist at heart created a whole different array of problems.

Finding the cake recipe was super easy, I was able to go to Martha Stewart’s website and find an amazing recipe for marble cake, which worked great. Coming up with the filling idea was not complicated either, I purchased raspberry preserves and made a ganache with dark chocolate and nutella. The problem was leaving the ganache in the fridge back home and realizing it the day before the wedding. Have I mentioned yet that the wedding was taking place 8 hours away from me?  Yeah, maybe I should have started with that tidbit of info. Thank goodness that there are Walmart’s everywhere.

I made sure to freeze the cakes ahead of time, and even got an insulated bag to place them in. Hyperventilating when I was trying to get them in the mini fridge at the hotel was not my finest moment.

Icing was a whole different animal. I had considered making it, but wasn’t convinced the buttercream would travel well even if frozen beforehand. I even considered hauling my KitchenAid  mixer and making it there, but gave up on that idea fairly quickly. I finally gave up on the notion of homemade buttercream and went the Wilton way, it was a great decision.

When I was making the peony about a month before the wedding, I forgot to consider that a single flower would have looked a bit bland, and it wasn’t until 2 days before I was supposed to leave that I thought of leaves or even little accents. Thank goodness for 2 things: I had enough sugar paste at home and Google search is a lifesaver. Let me tell you, free-styling leave cutouts is a pain, I have come to appreciate the art form.

In the end, it took, an insulated bag and a giant reusable bag full of utensils and materials to get this cake done. One thing that really helped me was coming up with a list of all the utensils and tools I would need, to help me pack. If only I had added the ganache to it, oh well!

Assembling the cake took less time that I had calculated. I trimmed the cakes, split the layers, filled them, crumb iced and did second coat in about 2 hours total. I was really happy with the finished product, and the bride and groom really liked it as well, so YAY!

I would love to hear your comments, also, do you have any tricks for traveling long distances with cakes?


Of Weight Loss and Weekly Dinner Planning

We’ve had a couple of huge things happen to us this past couple of months.

First thing was that during the summer my husband and I decided that we needed to take a look at how we were managing our finances. Our church was offering the Dave Ramsey 9 week course called Financial peace University and we jumped in at the opportunity. The course aims to teach you how to save, get out of debt and plan your finances so you can “live and give like no one else” in the future. It was a huge blessing for us. We were able to take a hard look at how we were spending our money and come up with a plan on how we wanted to spend it from now on.

I’m not saying it has been easy, quite the contrary, it’s been hard work and we have to be intentional in everything we do.

The second thing was moving. I remembered all over again why I hate it and how difficult it can be. Once everything was packed we had no choice but to eat out so much that our unhealthy habits started creeping back up. One of the areas we find rather tricky to manage is our food expending and consumption. I tend to go through cycles of unhealthy habits and utter laziness. Moving did not help at all.

Third thing was my grandmother passing away right in the middle of us moving. We had to drop everything and fly back home, which meant eating out and spending some more.

It just pushed us further and further into this cycle of unhealthiness. I tend to punish myself for my lack of control and for just being lazy, which is not a good thing. After this past guilt trip, I decided that enough was enough. I had to change. Not only for me but for the health of my family. I started wondering what I could do to help me stay on track, keep myself accountable and have a plan so I can reach my spending goals and my weight goals at the same time.

The first thing I did: I restarted keeping track of my food consumption. I know there are tons of apps and websites that help with this, but I love My Fitness Pal. Let’s start with the fact that it’s free, it’s very convenient to use and their food registry is huge. I love the fact that I can even create my own recipes and save them on my profile for future reference.

I gave myself a pat on the back because it was a huge decision to go back to tracking my food consumption. I know that for others it might not work, but for someone who has no self control around food (a.k.a. ME!), it gives you the accountability you need.

Then I wondered what else I could do, and I had a wonderful idea. I’m not saying I have been the first person to come up with this, I just remembered something I had seen. We had visited some friends a couple of weeks ago and I remembered how they had a blackboard on their kitchen wall with their entire weekly dinner menu. Although I thought it looked beautiful, it wouldn’t be practical for me since I wanted something I carry with me to reference when grocery shopping. I looked online and found a ton of meal planners. Nothing I found was appealing or practical, I just wanted to get something simple that just concentrated on dinner right now. I didn’t need something that planned the whole month, just a week to start with.

After much debate, I came up with the following Google Doc:

weekly meal planner

I thought it would be nice to share with you all. It is entirely customizable. I just wanted to make a template that would be useful for my family as well as anyone else that might be going through similar things.

Hope you all enjoy! Please let me know what you think.

Mother’s Day Craft for preschoolers

SAMSUNG CAMERA PICTURES

One of the things that gets me very excited each year is making Mother’s Day crafts with the little ones at church.

I was doing a search online and found a couple of cute pictures of a simple craft to make, but unfortunately they had no instructions attached to them. For me it’s very easy to figure out how to get to the finished product based on a picture alone, but I know that’s not the same case for everyone.

I decided to make my own easy craft and post the instructions on how to make it here.

SAMSUNG CAMERA PICTURES

Here’s what you’ll need:

  1. A paper plate cut in half. If you want to create an extra fancy craft, you can trace and cut a circle out of a craft foam sheet and then cut it in half.
  2. Crayons or markers. I prefer crayons since it’s easier to clean up.
  3. Foam flower stickers or any decorative stickers.
  4. Glue
  5. Hole puncher.
  6. Yarn, thread or ribbon.
  7. Happy Mother’s Day banner printed on nice cardstock.
  8. Tissue paper in different colors.
  9. Clear tape.

Here’s what you’ll help the little one do:

  1. First, take the two halves and have them face each other forming a pocket. Align the edges and using the hole puncher, punch one hole on each side.                                                                                                        SAMSUNG CAMERA PICTURES
  2. Cut out the Happy Mother’s Day Banner and give one to the little one. They can color it or if printed in a nice paper, They can glue it directly to the front side.
  3. If using paper plates, give them to the child with crayons and let them color to their hearts content. This is where their creativity can flourish. Once done, give them the stickers to decorate the edge of the front side of the pocket.                                        SAMSUNG CAMERA PICTURES
  4. Help them glue the phrase to the center of the plate. Attach both halves together by applying glue to the rim of a paper plate and placing another on top.  Help them thread the yarn, ribbon or material used through the holes previously punched and secure with a knot on each end.                                                                                                                                                                                                         SAMSUNG CAMERA PICTURES
  5. Cut the tissue paper in squares and instruct the children how to crunch up the tissue paper to make it look like flowers.
  6. Have them place the flowers inside of the pocket, they can be left as is, but if you want them extra secure, a little piece of tape can be added inside the pocket.


Hot Air Balloon Mobile

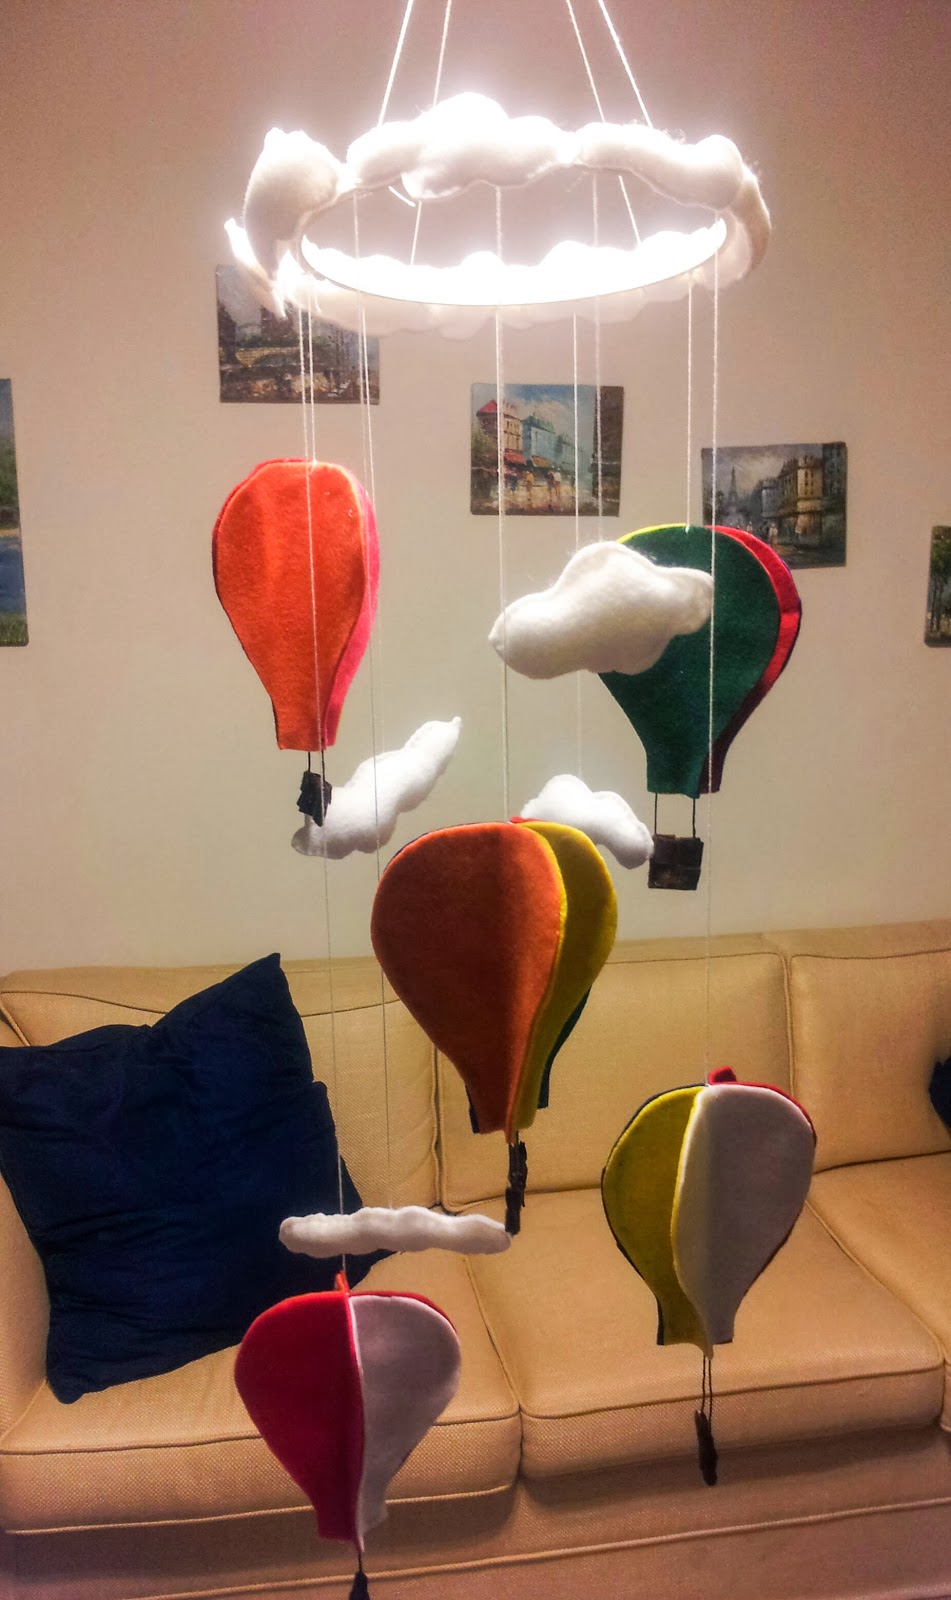
I have a wonderful friend who is expecting and while visiting her she showed me these beautiful glass balloons she had purchased for her baby’s room. It gave me a wonderful idea, to make her a handmade gift that would incorporate her balloon theme. I had seen some balloon mobiles on Etsy and Pinterest and thought to myself that  I could make one.
 
Here’s what you’ll need to make one:
  1. Felt in different colors (I ended up using about 1/4-1/2 yard of each color)
  2. Embroidery thread ( I used white and brown)
  3. Embroidery ring
  4. A book ring
  5. Glue gun and glue sticks
  6. Balloon pattern
  7. Pen
  8. Scissors
  9. Cotton filler
  10. Embroidery needle
  11. White acrylic glue
  12. Paintbrush
The first step in making the mobile was to find a balloon pattern online, I just performed a Google Search and printed the balloon I liked the most. Once that was done, I cut out the pattern and traced it on the felt. Each balloon had 4 sides, I needed a total of 24 balloon cutouts, but you can modify to who many balloons you’ll need.
 
Once the patterns were traced and cut, my next step was to work on the balloon baskets. For the baskets, I ended up cutting strips of brown felt and creating a weaved pattern of 4 strips height-wise and 12 small strips lengthwise. Each strip was about 1/2 inch. Once I had the weave completed, I glued everything down. I was able to fold the weave in half, (height-wise) and end with a 2 x 12 strip. I then started cutting my assembly down to 2 x 2 pieces and gluing approximately 3 inches of brown embroidery thread on each side. Below is a picture of the finished product.
 
 
For the balloons themselves I started by gluing two sides together as shown below.
 
That was followed by adding glue to the second side of the balloon and placing one of the strings of the embroidery thread on the glue (picture below).
 
I repeated both of the previous gluing steps and this is the finished product.
 
 
All the clouds I cut freehand, I made sure to fold my felt in half so each time I made a cloud I ended with two identical copies. If cutting the clouds freehand seems a little too daunting of a task, you can always search online for a cloud pattern or template and use that as a guide.


Instead of gluing the clouds together as I did for the balloons, I used the embroidery thread and needle to stitch them together. Before going all the way around on the stitching, I used cotton filler to fill the clouds and give them a 3D effect.


The embroidery ring was a plain wood once, I ended buying an 8 inch but looking back I could have used a smaller one. Since I didn’t want the wood to show I painted the ring white using some acrylic paint and a paintbrush.


Once the ring was dried assembly time came. I used the glue to place clouds all around the outside loop of the embroidery ring, making it seem like the balloons were reaching the sky.
 
Using my white embroidery thread and needle, I “sowed” a knot on the top of each balloon and added different lengths of thread in order to create my balloon heights. I also added some thread to plain clouds to help me fill any gaps between balloons.
 
 
To complete the assembly, I tied 5 long strings of embroidery thread to the inner loop of the embroidery ring. 
 
 
I had all the strings tied to a book ring that can be used to mount the finished product.
 
 
I also tied the balloons and clouds that were connected to embroidery thread to that inner ring before placing the outer ring and tightening. That way no thread knots can be seen from the outside and it keeps the mobile able to be adjusted without affecting the outer look.
 
Here’s another picture of the finished product:


Carrot Cake

My famous Carrot Cake

If there is one cake I’m very proud of, it would be my carrot cake. I like the fact that I can say it is low in fat, that it is delicious and that it is a household favorite. I hope you enjoy it as much as I do.

Carrot Cake Ingredients

1 cup all-purpose flour
1 cup whole wheat pastry flour
1 tsp baking powder
1 tsp baking soda
1 tsp salt
3/4 cup white sugar
3/4 cup brown sugar
3 eggs or equivalent egg substitute
3/4 cup milk and vinegar mixture ( to 1 cup of milk- any type- add 2 tbsp vinegar and let sit for 5 minutes)
2 tsp vanilla extract
3/4 cup applesauce
2 cups shredded carrots
1 cup shredded coconut (I use unsweetened)
1/2 cup chopped or crushed pecans
1/2 cup chopped or crushed walnuts
1 cup raisins
1 8 oz can of crushed pineapple with juice
2 tsp ground cinnamon
1/2 tsp ground ginger
1/4 tsp ground allspice
1/4 tsp freshly ground nutmeg

Directions:

  1. Preheat oven to 350°F (175°C). Grease and flour cake pans or if using a cupcake mold place paper liners.
  2. In a medium bowl, sift together flours, rising agents, salt and spices. Set aside.
  3. In a large bowl, combine eggs, milk mixture, applesauce, sugar and vanilla. Mix well.
  4. In a medium bowl, combine shredded carrots, coconut, nuts, pineapple and raisins.
  5. Add dry ingredients to wet ingredients and mix well until completely incorporated using a large spoon or spatula. Add carrot mixture to batter and fold in well.
  6. Pour into prepared pans, and bake at 350°F (175°C) for 20-25 minutes. This cooking time is for 3 8-inch pans, if baking on a square pan or bigger diameter, adjust baking times accordingly. I would suggest you check your cake in the center with a toothpick for doneness (if it comes out clean, it’s done). If baking cupcakes, you can use an ice cream scoop to put the batter into liners and bake for 15-20 minutes or until a toothpick inserted in the middle comes out clean.
  7. Allow to cool for at least 10 minutes before transferring to wire rack to be completely cooled.
  8. Once completely cooled, frost cakes with cream cheese frosting ( recipe below). You can add chopped nuts on side for added decoration.
  9. Enjoy!

Cream cheese frosting

Ingredients:

1 package of room temperature cream cheese ( Neuchâtel cheese can be used)
1 stick of butter at room temperature
1/4 tsp salt
4 cups confectioner’s sugar
1 tsp vanilla extract
1 tsp almond extract
2-3 tbsp milk ( fat-free half and half works as well)

Directions:

  1. On a stand mixer, cream butter and cream cheese for 5 minutes at high-speed until mixture turn paddle and if very fluffy.
  2. Lower speed and as salt and flavorings until incorporated.
  3. On low-speed, slowly add sugar to mixture. Once combined add milk for desired consistency. The less amount of milk, the thicker the frosting.